• Home
  • about emily
  • before + after
  • HGTV + DIY Network
  • good press
  • contact
  • Let’s Organize These Posts:

    • Art Attack
    • Backyard
    • Barn
    • Basement
    • Bathroom
    • Beach
    • Bedrooms
    • Being Thrifty
    • Business-y
    • Buying and Renting and Selling
    • Casual Celebrations
    • Closets
    • Curb Appeal
    • Dainty Details
    • Deck
    • Decor
    • Dining Room
    • DIY
    • Dog-Related
    • Entryway
    • Flooring
    • For the Kids
    • Garage
    • Gardening
    • Helping The Economy
    • HGTV + DIY Network Projects
    • Holiday-Related Projects
    • Home Safety
    • Kitchen
    • Lighting
    • Living Room
    • Merry Travels
    • Office Space
    • Organized
    • Other Pads
    • Outdoor Living
    • Scooter Fun
    • Stairwell
    • Sunroom
    • Supporting Sponsors
    • The Art Room
    • Tools
    • Uncategorizable
    • Wedding
    • Windows
    • Work-pads
  • Search

  • Hi, I’m Emily

    Emily Fazio

    I'm a home improvement enthusiast, living a very merry DIY lifestyle.

    You can find me writing for Home Living Handbook, HGTV.com, and a handful of other websites. Follow me on facebook and instagram, or drop me a note if you'd like. I love notes.

    Thanks for visiting!

  • BROWSE POSTS BY CATEGORY:

    • Art Attack (7)
    • Backyard (92)
    • Barn (8)
    • Basement (27)
    • Bathroom (43)
    • Beach (13)
    • Bedrooms (73)
    • Being Thrifty (53)
    • Business-y (12)
    • Buying and Renting and Selling (23)
    • Casual Celebrations (36)
    • Closets (17)
    • Curb Appeal (44)
    • Dainty Details (8)
    • Deck (23)
    • Decor (286)
    • Dining Room (37)
    • DIY (578)
    • Dog-Related (24)
    • Entryway (59)
    • Flooring (58)
    • For the Kids (32)
    • Garage (17)
    • Gardening (70)
    • Helping The Economy (30)
    • HGTV + DIY Network Projects (283)
    • Holiday-Related Projects (80)
    • Home Safety (12)
    • Kitchen (87)
    • Lighting (31)
    • Living Room (77)
    • Merry Travels (21)
    • Office Space (21)
    • Organized (41)
    • Other Pads (14)
    • Outdoor Living (12)
    • Scooter Fun (8)
    • Stairwell (20)
    • Sunroom (22)
    • Supporting Sponsors (43)
    • The Art Room (3)
    • Tools (43)
    • Uncategorizable (1)
    • Wedding (28)
    • Windows (14)
    • Work-pads (10)
  • Search

  • Pages

    • blog
    • Good Press: Special Features, Freelance Projects, and Long-Term Clients
    • Privacy Policy
    • about emily
    • before + after
      • before + after – transforming my first home
      • before + after, our current home
    • contact me
    • choose a badge and share the merrypad.com love
merrypad website logo with acorn and text
  • Home
  • about emily
  • before + after
  • HGTV + DIY Network
  • good press
  • contact

A Knitting #FAIL

July 18, 2012

I’ve been reluctantly showing off some of my big project failures in the last few months. I don’t always do things well, and like most of us, I have to learn from my experiences. I think it’s worth sharing some of those oops-moments here so you can observe and learn too (and maybe/possibly/hopefully someone out there can guide/inspire me to do it better).

This first effort at knitting my own carpet runner morphed itself from being a winning idea into a poopfest in a matter of hours (and I wasn’t keeping track of my time investment the same way I had been doing with the big bear shag rug, but there were many hours spent sitting at home, and many more hours of knitting in a car on a 6-hour road trip to Boston which only resulted in awesome car nausea), but here I am, sitting and writing about it and trying not to get too worked up because what I learned did lead me down a much better path. I’m finishing up the real-deal carpet runner this week, and I can’t wait to show it to you guys.

The original plan involved morphing a substantial piece of vintage cotton fabric that I bought (for $1) at a garage sale earlier this summer into a giant ball of DIY yarn that could be transformed into a real home accent, and then using that to create one helluva unique rug to sit across the sliding glass door entryway to the deck.

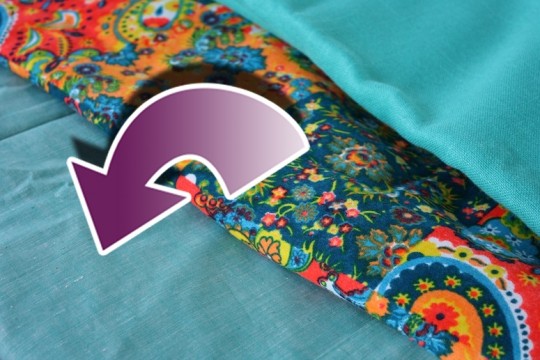
Yes, that teal fabric is about to look very disheveled.

The fabric itself was 5 yards in length and 45″ in diameter, so it was a nice piece of fabric that could have been used for a multitude of projects. Its texture and color, I loved, and I initially thought that crocheting it would be a fun project until I came to terms with the fact that I’ve never crocheted before and even after tutorials on youtube got me up to speed on some basic crochet tips, the act of hooking the entire thing at my beginner-crochet-star pace would have taken a long, long while. And it probably wouldn’t have looked all that awesome in the end.

I do know how to knit. A little bit. Like, thismuch. My mom, a knitting all-star who (not all that surprisingly) knit us everything from matching sweaters, to Christmas stockings, to assorted cold weather hats and mittens, taught me how to knit when I six or seven or maybe eight, although in learning at that age, I never focused much on the intricacies of building actual wearable forms or doing complex patterns like she did, but I rocked out some sweet straight scarves when handmade scarves had a resurgence sometime around 1998.

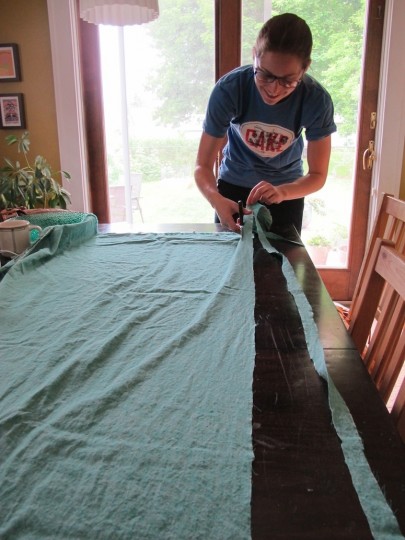
Once I had decided that knitting was the safe path for this effort, I began by rolling out my 5-yards of teal fabric across our desk-slash-dining room table and began cutting end-to-end making 1″ strips. At approximately 5-yards in length and 45″ in width, I estimated that I could make 525 feet of “yarn” for this project. That’s a lot.

Cut, cut, cut: Making fabric into something usable as "yarn".

Cutting the strips was easier (and faster) than I expected it to be. For one thing, I was working with really sharp scissors. This made it easy to zip the scissors along the fabric the same way you can sometimes successfully slice through good wrapping paper without actually having it make the scissoring motion to get a clean cut. You know what I’m talking about; it’s a good feeling. It also ripped through really evenly for the most part, so each strip ended up being just about 1″ in width.

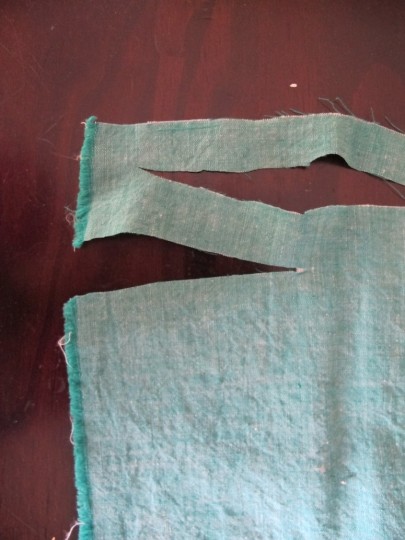
Note that this 5-yard strip of fabric was cut with intention of being one long strand, so I trimmed in a way that the cuts made the fabric zig-zag, and therefore was able to make some very long sections.

Cut the fabric so that it's creating one long single strand.

I rolled the lengths up into a yarn ball as I went. And only occassionally (twice) did I zipline the scissors off course and sever my uber-long strand of fabric. It was really painful the first time I messed up (emotionally, I mean), but in the end, after about an hour and a half of cutting, I had myself three large bigger-than-grapefruit-sized balls of DIY yarn. I suppose it was a good thing that the yard severed accidentally, or else the resulting single ball of fabric would have litch-rully been bigger than my head.

Making balls of yarn out of a piece of fabric.

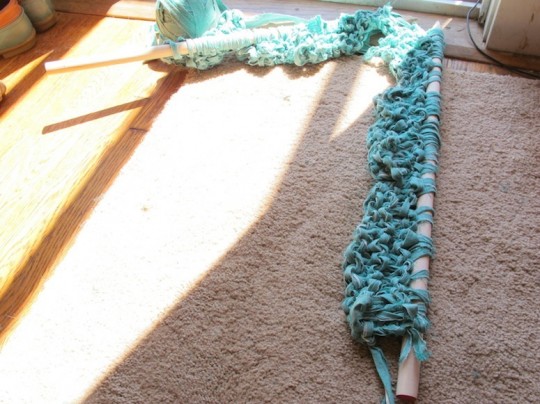
When it came time to knit, I made my own knitting needles out of a 48″ wooden dowel. At $4, it was an easy solution since I could guarantee that my rug was at least 18″ wide, and even better, upwards of 24″ wide since each needle could accomodate being wrapped along all 24-inches.

DIY knitting needles.

See? So comfortable, so easy. Except it was probably 90-degrees in the sunroom while I knit, and I was wearing pants, so, yeah, I’m aware that I look like I’m melting.

Knitting a rug!

I had done some preliminary guesswork on how long I could knit a runner if it was only 24″ wide and I had 525-ft of yarn to be working from. The result, I expected, would be between 5′-6′ in length, which I considered not too shabby for what still was just $1 worth of fabric. Most of the runners I had been shopping for prior to this adventure cost $80-200, and often were too-long a length for what I was looking for.

Yarn rug in progress.

What I didn’t expect up front is that this fabric yarn has a lot of play to it, and what started as a 24″ wide rug had quickly morphed into a 48″ wide rug after knitting about 5 rows in garter stitch style (just knitting stitches, not purling stitches).

As demonstrated here, the rug should really be about as wide as the needle is long. And I overfired my aim.

Oh geez, that rug is already way too long.

Sulk-sulk-sulk, tear it off, write off 3 hours of work, and rewind the yarn onto the ball. And then go run through the pink sprinkler in the yard, because it is h-o-t.

Oh geez, that rug is already way too long. Off the needles you will go.

I started again. And then again. Each effort, reducing the number of loops that I cast on the needle, ending up with a mere 25, having estimated that each loop was only going to stretch to fill about 1″ of width.

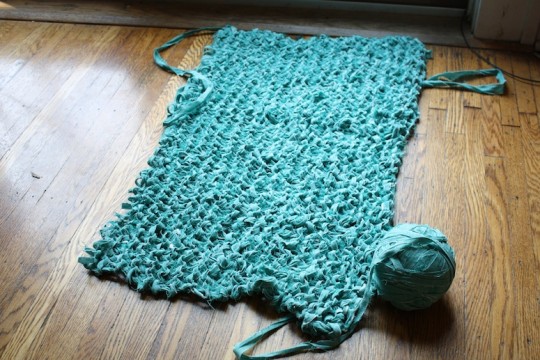
The width, in the end, I think I got right, but for some reason, it was taking much more fabric than expected to achieve a good length runner. The fabric stretched to meet the width of the rug I wanted, but lacked the stretch to run lengthwise, and after knitting through two whole balls of fabric, I somehow only had a square that was 24″x12″. One more yarn ball would only have gotten me to 24″x18″, which nowhere near the proportion I wanted. Although, look at it the other way and maybe it’d have made for a successful bathroom mat.

Rug failure. Pretty, but a failure.

This DIY yard/knit runner was a fail solely because it wasn’t the right amount of yarn, but the one I’m preparing to show you on Monday is spot-on what I think I needed all along.

Share

Decor  / DIY  / Flooring

Emily
I'm a home improvement enthusiast living a very merry, DIY-filled lifestyle. As a freelance writer, you can find my work on many popular home and garden sites, including HGTV.com, HomeLivingHandbook.com, and other outlets. Follow me on social, or drop me a note.

4 Comments


Mollie
July 18, 2012 at 9:44 am
Reply

Next time before you start, knit a guage. If you have large needles and yarn, cast one 5-10 stitches and then knit a few rows and cast off. You can measure the swatch and see how many inches 5 stitches actually makes and how many inches each row will be. Once you have your stitches per inch you can calculate how many stitches you need for the width! You could probably even measure the length of yarn you used and calculate if you have enough.


    Emily
    July 18, 2012 at 9:47 am

    Good tips, thanks Mollie!

Stephanie
July 19, 2012 at 12:24 pm
Reply

I knit a rug for my laundry area out of an old set of king-sized sheets, including the pillowcases. It didn’t go nearly as far as I thought it would, but the resulting rug worked out anyway. I probably would have needed a whole second set of king-sized sheets to make it the size I was envisioning.


Manu
August 31, 2012 at 11:30 am
Reply

Hi, Starting with a gauge is a definite must. Plus, you’ll avoid the fraying and shedding by cutting your material in BIAS, that is, diagonally. It will also give you a little more stretch, which will make it all the more comfortable to knit. Enjoy your projects! Manu


Leave a Reply Cancel reply

Your email address will not be published. Required fields are marked *

This site uses Akismet to reduce spam. Learn how your comment data is processed.

  • HI, I’m Emily

    Emily Fazio

    I'm a home improvement enthusiast, living a very merry DIY lifestyle. Follow me on facebook and instagram, or drop me a note if you'd like. I love notes.

    You can find me writing for Home Living Handbook, HGTV.com, and a handful of other websites.

    Thanks for visiting!

  • Instagram

    merrypad

    I’ll always say yes to a maker space experience, I’ll always say yes to a maker space experience, and The Shed at @timberland’s HQ did not disappoint ✌️🥾 @homelivinghandbook 

Final footwear design not shown 🙂

PS tagging some cute shoes they gifted from the Fall 2024 collection!
    I made the call and snapped off the elephant garli I made the call and snapped off the elephant garlic scapes yesterday evening. Who’s going to help us harvest and eat the next 1,000? 🧄🧄🧄🧄
    Hi! Boy, do I have things to share. 🎉 🫶 Fr Hi! Boy, do I have things to share. 🎉 

🫶 Friendly reminder to focus on balance and wellness: Pete and I lived abroad with our family for the entire month of August 2023. If you ever have the opportunity to work remotely, I promise it to be a worthwhile adventure that’ll change your POV in so many ways. And, If you need an in with an incredible AirBnB in Denmark, DM me. From new playgrounds and museums to the culture and design, making this trip a reality continues to be something we celebrate every day, and I wish everyone can experience it on some level.

💻 Friendly reminder to say yes to new (overwhelming) opportunities: The professional celebration happened upon our return. Last fall, I was approached to launch @homelivinghandbook, a new Pursuit channel for @mensjournal that highlights home improvement and DIY! It has been really fun to see it come to light, and truly one of the most exciting partnerships I’ve ever had. Timing couldn’t have been better, and I’m really happy to see how it grows over time. Please follow along — the team published 150 articles in two months, covering all kinds topics for home enthusiasts! So much more to come. #linkinbio #homelivinghandbook

✌️ the end, many thanks for your support!
    How much garlic is too much garlic? Maybe we’ll How much garlic is too much garlic? Maybe we’ll find out in 2024. Finished planting 1,005 cloves (and 19 shallots) in three new beds at the farm, and crossed one huge chore off my list 📝 #gardennotes #garden2024
    Instagram post 18003690670970980 Instagram post 18003690670970980
    We grew these fools. We grew these fools.
    pumpkin patch is doing great✌️#year1 #squashbl pumpkin patch is doing great✌️#year1 #squashblossoms #pumpkinpatch
    follow emily: @merrypad


  • Like Us On Facebook

    Facebook Pagelike Widget


  • Popular Posts

    • Building a Flagstone Patio in One Day 38 views
    • How to Dye Pasta Different Colors (Halloween Recipe) 36 views
    • The Easy Way to Hang Art on Brick or Stone 27 views
    • Reasons We Recessed Our Induction Cooktop 18 views
    • How to Build New Front Stairs and Railings 17 views
    • How to Make Your Own Barn Quilt 17 views
    • Designing a Durable Wooden Fence For Our Beautiful Backyard Garden 14 views
    • The Man’s New Throne 13 views
    • A Modern Roofline and Other Practical Features on Our DIY Treehouse 13 views
    • How to Make Creepy Halloween Windows 13 views


  • BROWSE POSTS BY CATEGORY:

    • Art Attack (7)
    • Backyard (92)
    • Barn (8)
    • Basement (27)
    • Bathroom (43)
    • Beach (13)
    • Bedrooms (73)
    • Being Thrifty (53)
    • Business-y (12)
    • Buying and Renting and Selling (23)
    • Casual Celebrations (36)
    • Closets (17)
    • Curb Appeal (44)
    • Dainty Details (8)
    • Deck (23)
    • Decor (286)
    • Dining Room (37)
    • DIY (578)
    • Dog-Related (24)
    • Entryway (59)
    • Flooring (58)
    • For the Kids (32)
    • Garage (17)
    • Gardening (70)
    • Helping The Economy (30)
    • HGTV + DIY Network Projects (283)
    • Holiday-Related Projects (80)
    • Home Safety (12)
    • Kitchen (87)
    • Lighting (31)
    • Living Room (77)
    • Merry Travels (21)
    • Office Space (21)
    • Organized (41)
    • Other Pads (14)
    • Outdoor Living (12)
    • Scooter Fun (8)
    • Stairwell (20)
    • Sunroom (22)
    • Supporting Sponsors (43)
    • The Art Room (3)
    • Tools (43)
    • Uncategorizable (1)
    • Wedding (28)
    • Windows (14)
    • Work-pads (10)


  • a little bit of everything, friends, DIY, and inspiration

    • Dadand.com < My husband and his BFF
    • HGTV
    • Home Living Handbook, a Pursuit Channel for Men's Journal
  • Some Legal

    Merrypad incorporates the occasional affiliate link to Amazon.com and Minted; we link to many other websites and products, but if it is in context of a paid sponsorship, it is always noted as such. Please review the privacy policy and contact me if you have any additional questions.

    Theme customized by Pete Fazio Creative, the guy from dadand.com.


© Copyright Merrypad