• Home
  • about emily
  • before + after
  • HGTV + DIY Network
  • good press
  • contact
  • Let’s Organize These Posts:

    • Art Attack
    • Backyard
    • Barn
    • Basement
    • Bathroom
    • Beach
    • Bedrooms
    • Being Thrifty
    • Business-y
    • Buying and Renting and Selling
    • Casual Celebrations
    • Closets
    • Curb Appeal
    • Dainty Details
    • Deck
    • Decor
    • Dining Room
    • DIY
    • Dog-Related
    • Entryway
    • Flooring
    • For the Kids
    • Garage
    • Gardening
    • Helping The Economy
    • HGTV + DIY Network Projects
    • Holiday-Related Projects
    • Home Safety
    • Kitchen
    • Lighting
    • Living Room
    • Merry Travels
    • Office Space
    • Organized
    • Other Pads
    • Outdoor Living
    • Scooter Fun
    • Stairwell
    • Sunroom
    • Supporting Sponsors
    • The Art Room
    • Tools
    • Uncategorizable
    • Wedding
    • Windows
    • Work-pads
  • Search

  • Hi, I’m Emily

    Emily Fazio

    I'm a home improvement enthusiast, living a very merry DIY lifestyle.

    You can find me writing for Home Living Handbook, HGTV.com, and a handful of other websites. Follow me on facebook and instagram, or drop me a note if you'd like. I love notes.

    Thanks for visiting!

  • BROWSE POSTS BY CATEGORY:

    • Art Attack (7)
    • Backyard (92)
    • Barn (8)
    • Basement (27)
    • Bathroom (43)
    • Beach (13)
    • Bedrooms (73)
    • Being Thrifty (53)
    • Business-y (12)
    • Buying and Renting and Selling (23)
    • Casual Celebrations (36)
    • Closets (17)
    • Curb Appeal (44)
    • Dainty Details (8)
    • Deck (23)
    • Decor (286)
    • Dining Room (37)
    • DIY (578)
    • Dog-Related (24)
    • Entryway (59)
    • Flooring (58)
    • For the Kids (32)
    • Garage (17)
    • Gardening (70)
    • Helping The Economy (30)
    • HGTV + DIY Network Projects (283)
    • Holiday-Related Projects (80)
    • Home Safety (12)
    • Kitchen (87)
    • Lighting (31)
    • Living Room (77)
    • Merry Travels (21)
    • Office Space (21)
    • Organized (41)
    • Other Pads (14)
    • Outdoor Living (12)
    • Scooter Fun (8)
    • Stairwell (20)
    • Sunroom (22)
    • Supporting Sponsors (43)
    • The Art Room (3)
    • Tools (43)
    • Uncategorizable (1)
    • Wedding (28)
    • Windows (14)
    • Work-pads (10)
  • Search

  • Pages

    • blog
    • Good Press: Special Features, Freelance Projects, and Long-Term Clients
    • Privacy Policy
    • about emily
    • before + after
      • before + after – transforming my first home
      • before + after, our current home
    • contact me
    • choose a badge and share the merrypad.com love
merrypad website logo with acorn and text
  • Home
  • about emily
  • before + after
  • HGTV + DIY Network
  • good press
  • contact

The Hardwood Floor Safety Squad

September 14, 2011

I keep finding myself going smaller and smaller with the DIY-ed portland cement planters. My latest one is a mini, and the perfect size for my newest baby-succulent that I brought home from Home Depot a few months ago (read about that excursion here). It sits right at home in an ornate Japanese dish I acquired at a tsotchke shop years ago.

Note: You always need something underneath a concrete planter – do not just let it sit freestanding on your windowsill and expect it to hold in moisture.

Mini-planter. A more managable 2-pounder and perfect home to my new little succulents.

The first cement planter was a monster, and even though it had broken into multiple pieces after I had shot putted the mold through the yard dozens of times, gluing it together with E-6000 seemed to be the cure-all.

The jumbo cement planter. Heavy - at least 40 pounds.

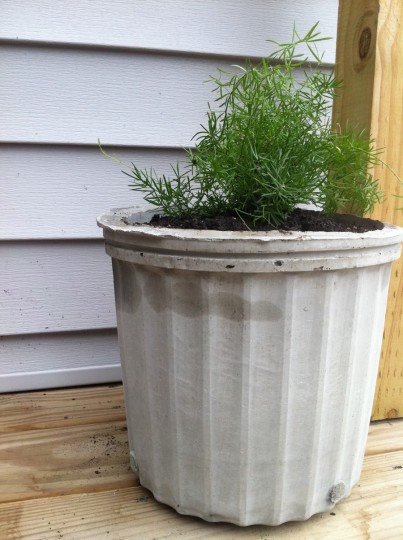
The second one I created was on a smaller scale, making use of a few recycled 3-gallon planters from previous Home Depot purchases. More manageable in size and weight, I also had better luck when removing the form from the mold: No crackage. I completely attribute it’s solid structure to the fact that the mold was very maleable and could be flexed away from the cement (once it had tried) and torn off with practically no struggle. So far, that little fern that was a $1 end-of-the-season find at the neighborhood market is doing very well.

Planter #2, molded by a maleable 3-gallon Home Depot planter.

But both of my first planter attempts were still big. And furthermore, neither of those planters were ready to live in the house full-time because I was concerned about the cement absorbing all of the moisture from the plants when I watered, and redistributing it into my hardwood floorboards through the bottom (also, yes, there are drainage holes drilled in the bottom so it was more likely to drip right on through to the floor, no obstruction). For the biggest planter at the very least, I needed to come up with an indoor living solution because the base of the pot was sizably larger than any plastic planter trays I already owned.

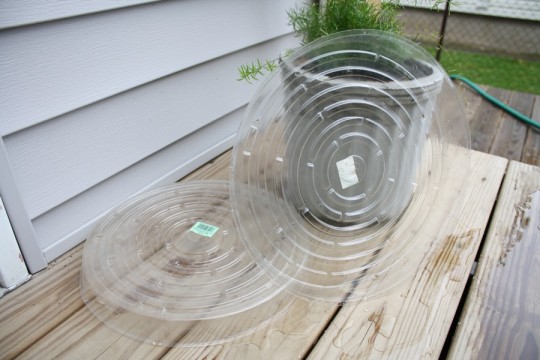
The perfect fix appeared before me before I really had a chance to give it much thought or shop around; very simply, I found my treasures in Pete’s parents attic when we were helpin’ out with a Labor Day weekend clean-out. The basic plastic trays caught my eye, and found their way home with me instead of being thrown into the dumpster. I couldn’t be sure at the time, but I definitely thought there was a slight chance that they might be exactly the same size as the ginormous planter with tropical-ish leafy plant that was still hanging out on the porch slowly taking a beating from the cooler night air.

Big, clear planter bases. One man's trash...

And twa-la, wouldn’t you know that my spider senses were spot on? The planter fit perfectly in this tray (while the previously-largest tray in my stash that wasn’t quite big enough looks on in jealousy).

Yesss, the new plastic base is the perfect size for the monsterous planter. Of course, the reason I didn’t rush right out and get a new big plastic faux-terra cotta planter at Home Depot was because it didn’t really vibe with the straight-lined, wants-to-look-totally-au-natural cement planter. The clear plastic one is a much more simplistic alternative (and low profile, kind of like low-rise socks of the indoor gardening world), but still a reliable alternative to keep my floor dry and keep the clean lines of the planter exposed.

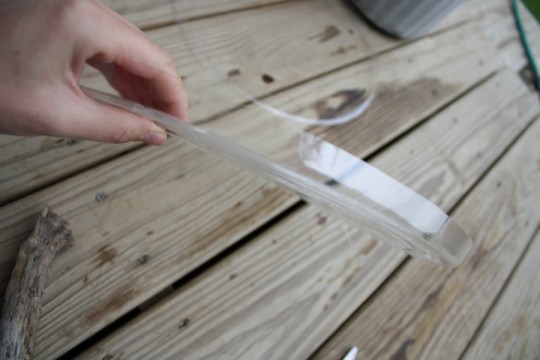
I thought I could take it one stage further though, by taking the walls of the planter down an extra half an inch to minimize the plastic lip but still be suitable for floor protection.

Trimmed down the lip of the tray even further, leaving a 1/2" edge to hold the planter.

I even tried spraypainting one of the trays with the same specific-for-plastics paint that I used on the office chair because the shiny transparent plastic in person has a hint of that “just bought and forgot to take the price tag off it” feel. White seemed to correct that look without being too stand-out-ish.

White paint to take the glare off of the plastic planter tray.

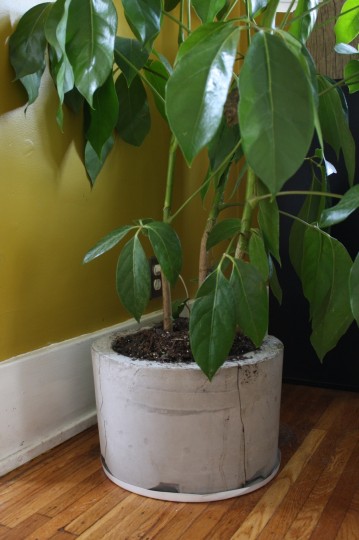
It worked (of course it would, this isn’t anything revolutionary) so the gigantic plant is happily living inside once again, protected from the encroaching fall elements but still getting lots of natural sunlight through the living room windows. Although I’m kind of starting to think maybe I should match the tray to be the same color as the cement… oh the things you wish you had done differently once you see your photos…

Planter and streamlined new tray. Wonderous.

And just for kicks, my dad would love to point out that the plants that would do best in these cement planters are species that are categorized as “foundation plants”… as in, plants that you’d be directed to use in the landscaping closest to your homes exterior foundation.

If you’ve made cement planters and found a great way to make custom-sized trays to match, I’d love to know more.

Share

Being Thrifty  / DIY  / Gardening

Emily
I'm a home improvement enthusiast living a very merry, DIY-filled lifestyle. As a freelance writer, you can find my work on many popular home and garden sites, including HGTV.com, HomeLivingHandbook.com, and other outlets. Follow me on social, or drop me a note.

4 Comments


Kate
September 14, 2011 at 9:04 am
Reply

Those planters are so cool!


    Emily
    September 14, 2011 at 9:45 am

    Easy to make too, Kate! Thanks!

Emily @ Our Waldo Bungie
September 14, 2011 at 11:32 am
Reply

Would it help to spray a clear coat of spray paint on the outside of the planters to ensure they don’t crack or leak? I had to do that with with my terra cotta pots before I painted them so they wouldn’t crack, but I would think you could do the same with the cement planters – just don’t paint them after?


    Emily
    September 14, 2011 at 1:11 pm

    I’m not sure that I’d trust spray paint to prevent the moisture from reaching the hardwoods, but it would probably add a nice aesthetic shine. I do like the sounds of that. The pots do have small drainage holes like any terra cotta pot would have, so something needs to be under it to capture that drainage.
    Thanks Emily!

Leave a Reply Cancel reply

Your email address will not be published. Required fields are marked *

This site uses Akismet to reduce spam. Learn how your comment data is processed.

  • HI, I’m Emily

    Emily Fazio

    I'm a home improvement enthusiast, living a very merry DIY lifestyle. Follow me on facebook and instagram, or drop me a note if you'd like. I love notes.

    You can find me writing for Home Living Handbook, HGTV.com, and a handful of other websites.

    Thanks for visiting!

  • Instagram

    merrypad

    I’ll always say yes to a maker space experience, I’ll always say yes to a maker space experience, and The Shed at @timberland’s HQ did not disappoint ✌️🥾 @homelivinghandbook 

Final footwear design not shown 🙂

PS tagging some cute shoes they gifted from the Fall 2024 collection!
    I made the call and snapped off the elephant garli I made the call and snapped off the elephant garlic scapes yesterday evening. Who’s going to help us harvest and eat the next 1,000? 🧄🧄🧄🧄
    Hi! Boy, do I have things to share. 🎉 🫶 Fr Hi! Boy, do I have things to share. 🎉 

🫶 Friendly reminder to focus on balance and wellness: Pete and I lived abroad with our family for the entire month of August 2023. If you ever have the opportunity to work remotely, I promise it to be a worthwhile adventure that’ll change your POV in so many ways. And, If you need an in with an incredible AirBnB in Denmark, DM me. From new playgrounds and museums to the culture and design, making this trip a reality continues to be something we celebrate every day, and I wish everyone can experience it on some level.

💻 Friendly reminder to say yes to new (overwhelming) opportunities: The professional celebration happened upon our return. Last fall, I was approached to launch @homelivinghandbook, a new Pursuit channel for @mensjournal that highlights home improvement and DIY! It has been really fun to see it come to light, and truly one of the most exciting partnerships I’ve ever had. Timing couldn’t have been better, and I’m really happy to see how it grows over time. Please follow along — the team published 150 articles in two months, covering all kinds topics for home enthusiasts! So much more to come. #linkinbio #homelivinghandbook

✌️ the end, many thanks for your support!
    How much garlic is too much garlic? Maybe we’ll How much garlic is too much garlic? Maybe we’ll find out in 2024. Finished planting 1,005 cloves (and 19 shallots) in three new beds at the farm, and crossed one huge chore off my list 📝 #gardennotes #garden2024
    Instagram post 18003690670970980 Instagram post 18003690670970980
    We grew these fools. We grew these fools.
    pumpkin patch is doing great✌️#year1 #squashbl pumpkin patch is doing great✌️#year1 #squashblossoms #pumpkinpatch
    follow emily: @merrypad


  • Like Us On Facebook

    Facebook Pagelike Widget


  • Popular Posts

    • How to Dye Pasta Different Colors (Halloween Recipe) 48 views
    • Designing a Durable Wooden Fence For Our Beautiful Backyard Garden 45 views
    • The Easy Way to Hang Art on Brick or Stone 33 views
    • How to Make Your Own Barn Quilt 19 views
    • 7 Steps for Restoring an Old Midcentury Sideboard Buffet 19 views
    • Building a Flagstone Patio in One Day 14 views
    • Stained Cabinets: A 6-Month Update 13 views
    • The Best Stain for a Natural Wood Shiplap Wall 12 views
    • How to Make Creepy Halloween Windows 12 views
    • How to Reverse an Unwanted Pet Door and Make Repairs 12 views


  • BROWSE POSTS BY CATEGORY:

    • Art Attack (7)
    • Backyard (92)
    • Barn (8)
    • Basement (27)
    • Bathroom (43)
    • Beach (13)
    • Bedrooms (73)
    • Being Thrifty (53)
    • Business-y (12)
    • Buying and Renting and Selling (23)
    • Casual Celebrations (36)
    • Closets (17)
    • Curb Appeal (44)
    • Dainty Details (8)
    • Deck (23)
    • Decor (286)
    • Dining Room (37)
    • DIY (578)
    • Dog-Related (24)
    • Entryway (59)
    • Flooring (58)
    • For the Kids (32)
    • Garage (17)
    • Gardening (70)
    • Helping The Economy (30)
    • HGTV + DIY Network Projects (283)
    • Holiday-Related Projects (80)
    • Home Safety (12)
    • Kitchen (87)
    • Lighting (31)
    • Living Room (77)
    • Merry Travels (21)
    • Office Space (21)
    • Organized (41)
    • Other Pads (14)
    • Outdoor Living (12)
    • Scooter Fun (8)
    • Stairwell (20)
    • Sunroom (22)
    • Supporting Sponsors (43)
    • The Art Room (3)
    • Tools (43)
    • Uncategorizable (1)
    • Wedding (28)
    • Windows (14)
    • Work-pads (10)


  • a little bit of everything, friends, DIY, and inspiration

    • Dadand.com < My husband and his BFF
    • HGTV
    • Home Living Handbook, a Pursuit Channel for Men's Journal
  • Some Legal

    Merrypad incorporates the occasional affiliate link to Amazon.com and Minted; we link to many other websites and products, but if it is in context of a paid sponsorship, it is always noted as such. Please review the privacy policy and contact me if you have any additional questions.

    Theme customized by Pete Fazio Creative, the guy from dadand.com.


© Copyright Merrypad