Officially 4 weeks into the bathroom renovation, but as far as you know, we’re on Day 4 of hard work. I can report that even in real-time we still don’t have our shower back. I miss it. A lot. But we’re powering through problems and making things happen.
Unrelated to replacing valves and ogling all of the to-be-installed tile, I’ve actually spent an inordinate amount of time this week shopping online for shower curtain rod options, thinking that one of those ceiling-mounted curtain tracks would be a fun thing to try out instead of a traditional tension rod. The only downfall in my eyes are those metal beady strands that drop down from the ceiling. Does anyone know if there’s a well-manufactured alternative to beady drops? I say well-manufactured because Pete already talked me out of DIYing something, for fear that it wouldn’t glide well. And if that shower curtain doesn’t glide well, that’ll irk me more than knocking shampoo off the shelves with my flailing elbows (reference last week’s post on building custom shelves if you never want to whale shampoo with your elbows).
But before I get to actually installing shower curtains, I had a lot of unexpected decisions to make this week.
The subway tiles that are lining the hallway are taunting me. Staring at me as I walk by. They’re begging to be installed, and still, I had to put them on hold for another day. Why? More plumbing-related roadblocks, that’s why.

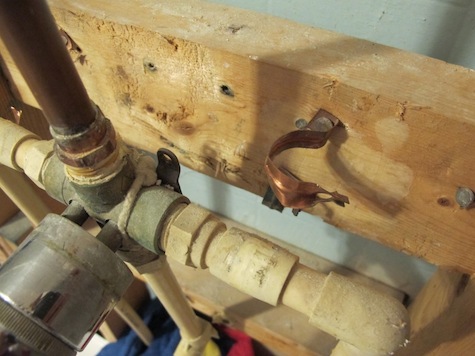
We finished most of the HardiBacker cement board during our last day working on the bathroom (Day 3), but ran into an issue right around any normal person’s bedtime that caused us to stop in our tracks. The old CPVC and copper plumbing that ran water into the faucet and shower head had previously been installed in such a way that the pipes protruded from the wall further than the studs, so we couldn’t attach the cement board until we repositioned the plumbing.
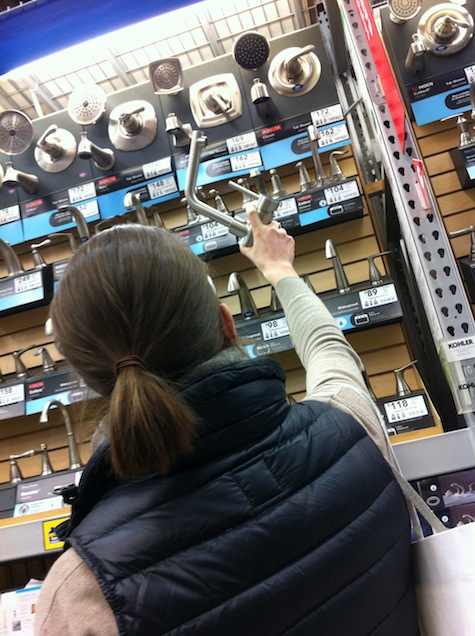
I discovered another pricy issue too: The manufacturer of my original shower valve wasn’t identifiable – and in all honesty, the trim had the insignia of a brand I had never seen before. I had planned on updating the trim of the faucet by buying a replacement handle and new faucet spout, but that plan flopped and turned into something much bigger.
First things first: The shower pipe. To get it flush with or beneath the wall studs, we had to shift it back a few inches, but when we realized we couldn’t use any in-stock replacement handles, we knew the only answer was to replace the entire valve too. As you can see in the first picture of this post, replacing the valve (where the knob is) involves replacing… everything. On the bright side, we were losing the plastic crystal knob and going to upgrade the whole system to our liking.
Buying a new valve isn’t as simple as it sounds because every manufacturer these days selling through convenient channels bundles the valve and handle, the shower head, and quite often, even the faucet together into one near 10″x18″ box for consumer and contractor efficiencies. I get it, I’m all about monetary and time efficiency, so that makes sense. Based on some conversations I’ve had, it sounds like you CAN order special individual components, but then you’re (I’m) delaying the construction waiting for pieces to come in the mail and you (I) already really (really, really) miss the shower and you’re (I’m) willing to bite the bullet and spend a little more, even if you don’t need another shower head and want to continue to use the one you already have. When it comes right down to numbers, the incremental cost to buy the whole valve/faucet/handle/shower head combo box really isn’t that significant (one valve may have cost $130, whereas the whole box of goodies cost $172).
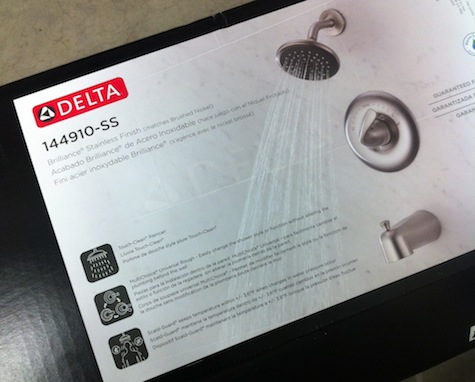
The new kit I selected was by Delta and had a more streamlined, modern design than many of the other kits in my price range. Finished in Brilliance Stainless, Delta’s trademarked name for Satin Nickel, the lines went well with the IKEA Grundtal faucet on the vanity that I already bought (and yes, I carried it to the store with me to try and match finishes).
They’re pretty, but $172 unexpectedly takes a bite out of my $1,500 total budget.
Replacing the valve on the shower means that the entire shower needed to be re-plumbed, and that’s not something we had been hoping to do. We tried to make the most efficient use of the opportunity, buying new PEX pipes ($2.98) and Gator Bite fittings ($50). Back at home with all of the materials, I started by turning off the water and loosening the existing pipes from the studs. I wrapped a towel around the base of the pipes to avoid water gushing out uncontrollably when I severed the existing hot and cold water pipes. There wasn’t a lot stored in the pipes, but it did help collect a half-cup or so.
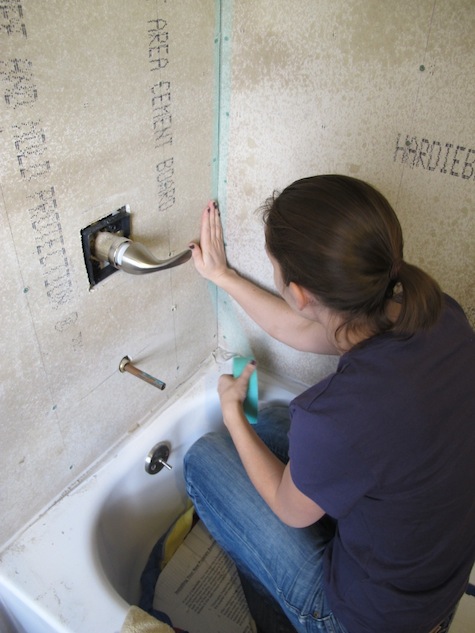
With all piping removed, we quickly realized that there would be no bathing until it was reinstalled, so we proceeded optimistically, hoping that it wouldn’t take 5 days to figure it out. We seized the unexpected opportunity to raise the height of the shower 10″, which makes a big difference for 5’9″ people like me.

In the picture, I’m marking the original height of the shower with my hand, and showing you how much higher we installed the 2×4 brace with shower fitting. It’s now at about 6’8″ from the base of the tub, and more than ever before, I can’t wait to test it out.

After mounting the placement of the new shower fitting, we prepared the new valve itself, first by wrapping the threads with white Teflon PTFE tape.
Also, before install, I applied the Gator Bite fittings to the valve securely, knowing that they’d all be more difficult to twist into place once the valve was screwed into the stud.
If you’re wondering how we determined how far back to position the valve, the instructions pretty clearly explained how much of the valve needed to protrude outside of the tile, and graciously allowed about 3/8″ of wiggle room. The easiest way for us to do this was to extend a scrap piece of cement board level on the stud, and layer one subway tile over that with an extra 1/8″ allowance for mortar, just to help visualize how thick those finishing components would be on top of the stud. Then we measured backwards to determine where the back of the valve would need to rest flush. The framing nailer helped us to quickly anchor the 2×4 in place, and the valve was installed and leveled quickly.
Take a second to familiarize yourself with an exposed valve; hot water on the left, cold water on the right. The fitting going straight up will allow the flow of water to the shower, and the fitting going down is for water going to the tub faucet spout. We aligned the fitting for the spout directly beneath that downspout, and we were all ready to install the PEX lines.

Side note: We did use a bunch of recycled 2×4 boards; they appear a little damp because they were in the vicinity of the pipes when I severed them, but were structurally in good shape.
Going upwards from the valve to the newly anchored shower head fitting, I installed my first piece of PEX. Soft and flexible, it was cut to length easily with a sharp utility knife, and popped directly into the Gator Bite.
Another note: There are extra white fittings that you need to use when you’re installing PEX to a Gator or SharkBite fitting. The long and short of it is that you’ll ened to put that fitting into the end of the PEX and then insert the entire tip into the fitting. Read the instructions carefully, because I read on many forums that DIYers were confused with this step. None of us want leaky pipes.

We connected PEX to the original hot/cold water too, bringing pressure back up to the new valve. The downspout, however, is connected to the valve with copper piping per the manufacturer instructions. With a temporary piece of PEX attached to the downspout to direct water into the tub, I tested out the work. Success. I love plumbing and never knew I could.

In order to test that the shower was plumbed correctly, we attached the new faucet temporarily to engage the diverter. We ran the shower for a few minutes too, and then checked all over for possible leaks between the fittings and the valve and the outputs.

Confident in our plumbing job, we sealed the moisture barrier over the lip of the new tub after cleaning it with denatured alcohol. Once the 6mil moisture barrier was pressed into the edge of the tub against the silicone, you create a thorough seal that prevents water from flooding up behind the cement board and into the wooden studs.

Moisture barrier in place and plumbing cleared of leaks, it was time to install the final pieces of HardiBacker cement board and tape the joints. I chose to use a self-adhesive mesh that deters mold, and if you haven’t had a chance to use it before, I do recommend it. It unrolls and sticks with little effort, creating a nice bond. The only trouble I can report is that the edges can begin to fray, and once it does, it can become a tangly sticky mess. I’ve seen it more problematic when you’re using it on drywall (it’s harder to hide frays beneath joint compound) but it shouldn’t be an issue in the shower since once it’s mudded with mortar, it will be coated by solid tiles.
Speaking of tiling, that’s next!
To read more stories about this renovation:
Day 3: Building custom shower shelves, moisture barriers, and cement board


Comment
Thank you, Emily! The article helped me in replacing the shower valve. Keep up the good work.