When I first “finished” the driftwood lamp a few months ago, I had bought this bright white drum shade from Target knowing full-well once I saw it on the lamp that it wasn’t going to work. So, back to the store it went (and back into my pocket went $16).

The wired lamp base has sat on the sunroom floor ever since; I’m sure it was still Lake Ontario water-logged and needed more time to dry out anyways. I had been shopping for and bringing home other shades during that time, but none of them worked – not even this huge drum shade that my buddy at the local salvage shop gave me fo’ free (because it was pretty grimy).

Given the tall and narrow proportions of the base, the big shade wasn’t jiving with me right. But that’s not to say it wouldn’t have worked out somehow – I considered rehabbing the shade with new fabric or paint, and know if I see someone on Pinterest do it I’ll still probably crumble in envyousy (a wee combo of envy and jealousy). But back to the shade-to-base proportions: I just wasn’t feeling it with any that I found in my travels, so I sat back and waited for better inspiration, which I’m happy to say finally arrived this week.
Looking at the driftwood for so long also made me decide that maybe the proportions of the base were just too wonky for my taste overall, and as I had mentioned before, I was really thinking that slap-chopping the wood into two matching, squattier lamps might be a better use of the materials. (Plus, who doesn’t like a nice 2-for-1 deal?).
Well, that’s just what I did.
A perfect cut in half around the middle meant that I would be left with two 8.5″ x 8.5″ tall lamps, which seemed more tolerable given the living room space (which is where I’m currently seeing them live, at least semi-permanently).
Because I wanted to rip through it with the miter saw, I needed to make sure that there were no rowdy obstructions (rusty nails) in my cutting path, and a careful assessment only yielded that only one stood a chance of being in my way, so I removed it. It’s free, and pointing at the exact 8.5″ mark right here. And yes, that was one honkin’ nail.

The miter saw that I used worked pretty well; it didn’t go through the full piece of wood, even when I cut both sides of the lumber, so I used a hand saw to cut the final 1/2″ or so that was binding the two pieces together.
Right away I re-wired one of the two pieces using materials I had in-house (read: free) to see how it would look with the lighting hardware attached. Verdict? Lookin’ good.

And if you’re wondering, I did cushion the bottom of these driftwood pieces for two reasons: 1) If it wasn’t padded, it could scuff up the table surface, and 2) the cuts with the saw weren’t perfectly smooth, so the fuzzy-side-of-the-velcro-pad helped to balance the situation out. A thin panel of felt glued to the bottom would have done well too.

The inspiration for the shade that I’m writing about here drove me to use another somethin’-somethin’ that I had been holding on to for awhile: this coloring book from Anthropologie. Immediately upon finding it I had lots of questions. Was it an adult’s coloring book and why would adults buy coloring books? Should it belong to Richie Rich? This couldn’t be a kid’s coloring book priced at $29.95? (Mine was only $14.95 on clearance, high five.) Or was it meant to be something that could be artistically hung? Maybe used for decoupaging? That’s how I was spinning the case in my mind, rationalizing that $15 for 50 pages of art wasn’t a bad deal because that brought the price-per-page down to a very tolerable I-find-this-in-the-Wegman’s-parking-lot-weekly 30-cents. Cheap art. Pretty art.
 It’s not your average coloring book, if that’s what it was meant to be. The black and ivory pages are totally swoon-worthy and individually framable. Intricate in pattern, each page is completely different from the next, and my imagination was telling me that I could maybe, possibly, probably make a paper lampshade from it.

As I forged ahead with a plan to make this brainchild of a paper lampshade, I selected 4 pages of art that were similar in the sense that they were mostly ivory with black line detailing. I used a razor blade to carefully slice the pages from the binding, and then cut each sheet into 3 pieces width-wise so I was left with 12 4″ wide strips of paper. And no, I was not accurate, I was eyeballing it, which was fine by me.

Those pieces of paper were evenly sorted so no like-pieces were side-by-side, and then hot-glued together, edge to edge, using Pete’s manly hot glue gun (featuring manly yellow super-strength glue). I haven’t actually used a glue gun since I lived with my parents and helped out with Girl Scout projects, so this was fun for me. And yes, I felt like I was going to get scolded for letting it drip on the table. It was more fun than I’m letting on now.
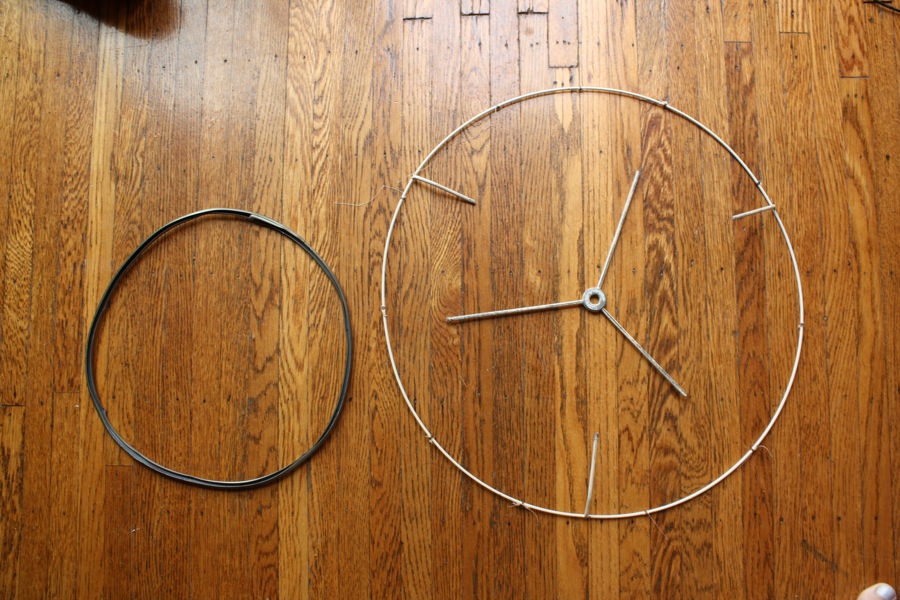
 To develop a very necessary framework for this shade to hang on, I tore apart the large drum shade I showed you earlier. See how the fabric was affixed to several metal hoops? I tore that thing apart with the same vigor as Truckasaurus when he/she/it chomps through demolition-worthy vehicles (and I’m only referencing this and aware of this kick-ass phenomenon because we saw it on the NY Thruway over the weekend and it made Pete light up like a 5-year old boy).
 In any case, my ferocity left me with a slew of hoop and usable shade-structure materials.
 My main goal was to make a solid framework from the existing materials; the shade itself was going to be made of paper, so despite being cool in my mind, I also realize that Pete’s little girl will go to turn on the light the first time and probably tear it, and such an occurrence will be fine. (I’ll probably be ready for a lampshade switcheroo by then anyways.)
Using one of the round pieces, I trimmed and hot-glued the coil to be smaller than it was originally; I didn’t want a huge shade, just one that appeared proportional and not overwhelming the newly cut base. I used wire cutters (and a hack saw, but possibly because I was being weak with the cutters) to detach the part of the shade that attaches to the lamp harp.

The three-pronged piece fit perfectly within the custom hoop, and with a little hot glue, stayed in place well. The whole piece was spray painted with a glossy white and a glossy clear top coat before I did anything further with it.
Once it had dried, I carefully glued the paper frame directly to the hoop with the glue gun, and within a minute it was ready to be installed.
Excitement ensued, although I’m seeing three things I’d like to fix. And I’m not talkin’ about that pile of stuff on the floor at the right (Dad surprised me with old junk yesterday) or the sloppy shelves (that I’m just cringing at now):
 1) The bottom of the shade is looking a little uneven; it could use a second hoop to hold the shade in a better drum shape.
2) The base of the harp wobbles back and forth on the driftwood. I’m thinking of gluing it right into place to lock it in more securely, since it contributes heavily to shade un-levelness.
 3.) I had some yellow glue overflow when assembling the shade. Only a big issue if you’re looking down into the lamp, but yellow and a nuisance nonetheless.
 But learning curve issues aside, I’m loving it in the living room. And Cody’s still loving that dog bed I made earlier this week. The lamp’s once-siamese twin will sit on the other side of the couch once I buy a sweet little assembly kit or another old fixture to tear apart.

P.S. Tamarack art installed over the IKEA cabinetry! It’s been there for a few weeks now, and I’m feeling like it’ll stay there awhile longer.


7 Comments
I love it!
LOVE the lamp!!!!!!!! Seriously… LOVE LOVE LOVE it! Nicely done!
Thanks Ashley! :) I’m really, really happy with how it turned out.
OH MY GOSH!!! I love it! Totally blown away!
Thanks Jami!
This is great too, very creative. You can see I love me some driftwood here, http://thespacebetweenblog.wordpress.com/2011/11/01/pinterest-challenge-driftwood-christmas-tree/ :)
That’s the one I saw! Cute. Free driftwood access is the best.