• Home
  • about emily
  • before + after
  • HGTV + DIY Network
  • good press
  • contact
  • Let’s Organize These Posts:

    • Art Attack
    • Backyard
    • Barn
    • Basement
    • Bathroom
    • Beach
    • Bedrooms
    • Being Thrifty
    • Business-y
    • Buying and Renting and Selling
    • Casual Celebrations
    • Closets
    • Curb Appeal
    • Dainty Details
    • Deck
    • Decor
    • Dining Room
    • DIY
    • Dog-Related
    • Entryway
    • Flooring
    • For the Kids
    • Garage
    • Gardening
    • Helping The Economy
    • HGTV + DIY Network Projects
    • Holiday-Related Projects
    • Home Safety
    • Kitchen
    • Lighting
    • Living Room
    • Merry Travels
    • Office Space
    • Organized
    • Other Pads
    • Outdoor Living
    • Scooter Fun
    • Stairwell
    • Sunroom
    • Supporting Sponsors
    • The Art Room
    • Tools
    • Uncategorizable
    • Wedding
    • Windows
    • Work-pads
  • Search

  • Hi, I’m Emily

    Emily Fazio

    I'm a home improvement enthusiast, living a very merry DIY lifestyle.

    You can find me writing for Home Living Handbook, HGTV.com, and a handful of other websites. Follow me on facebook and instagram, or drop me a note if you'd like. I love notes.

    Thanks for visiting!

  • BROWSE POSTS BY CATEGORY:

    • Art Attack (7)
    • Backyard (92)
    • Barn (8)
    • Basement (27)
    • Bathroom (43)
    • Beach (13)
    • Bedrooms (73)
    • Being Thrifty (53)
    • Business-y (12)
    • Buying and Renting and Selling (23)
    • Casual Celebrations (36)
    • Closets (17)
    • Curb Appeal (44)
    • Dainty Details (8)
    • Deck (23)
    • Decor (286)
    • Dining Room (37)
    • DIY (578)
    • Dog-Related (24)
    • Entryway (59)
    • Flooring (58)
    • For the Kids (32)
    • Garage (17)
    • Gardening (70)
    • Helping The Economy (30)
    • HGTV + DIY Network Projects (283)
    • Holiday-Related Projects (80)
    • Home Safety (12)
    • Kitchen (87)
    • Lighting (31)
    • Living Room (77)
    • Merry Travels (21)
    • Office Space (21)
    • Organized (41)
    • Other Pads (14)
    • Outdoor Living (12)
    • Scooter Fun (8)
    • Stairwell (20)
    • Sunroom (22)
    • Supporting Sponsors (43)
    • The Art Room (3)
    • Tools (43)
    • Uncategorizable (1)
    • Wedding (28)
    • Windows (14)
    • Work-pads (10)
  • Search

  • Pages

    • blog
    • Good Press: Special Features, Freelance Projects, and Long-Term Clients
    • Privacy Policy
    • about emily
    • before + after
      • before + after – transforming my first home
      • before + after, our current home
    • contact me
    • choose a badge and share the merrypad.com love
merrypad website logo with acorn and text
  • Home
  • about emily
  • before + after
  • HGTV + DIY Network
  • good press
  • contact

The Basement Plan & Demolition (Part 1)

January 6, 2011

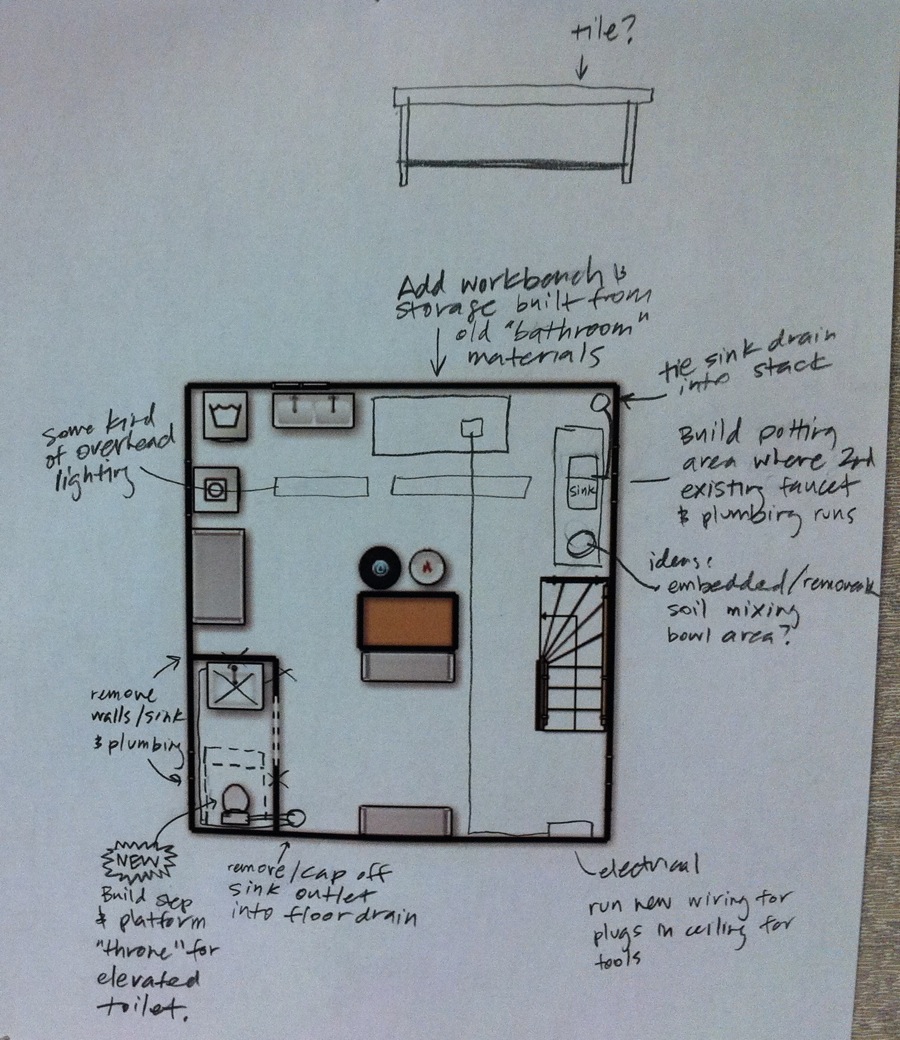
The basement rehabilitation is in full effect! By updating the layout down there, we’ll be rewarded with 567 sq. ft. of more usable, functional, and friendly space (and we’ll have a much better way of organizing tools and gardening supplies). Not so long ago, I posted some photos of the basement “before” we had a truly actionable plan of attack (check that post out here) and now, I’m sharing a follow-up post to give you a sneak peek of our work-in-progress, and more importantly, a road map for the overall plan.

Updated plan for the basement overhaul. New plumbing, lighting, and storage.

  1. Yes, there’s a small unfinished bathroom down there. We’ll be removing the walls, sink, and sink plumbing. Materials are being carefully salvaged so they can be upcycled into a big workbench/storage unit.
  2. Pete wants to keep the toilet installed but will fashion the area with a new floor platform because the current one isn’t in great shape anymore. (I’m lovingly referring to this solitary toilet as his throne.)
  3. As part of the plumbing reorg, he’s going to be removing and capping off an old sink outlet in the “old bathroom” area.
  4. Not only are we going to make a workbench/storage area from the old bathroom materials, but I’m also going to create a potting area for plants against a wall which is already equipped with brand-spankin’-new copper plumbing (it’s just begging for a sink, I tell you).
  5. Electrically speaking, we’ve begun by removing the lighting from the “old bathroom” and are going to replace the lost lighting over the laundry and new workbench area. We can run a simple new wire for plugs straight from the electrical box.
  6. Also, you can’t really tell in the above photo, but the whole area beneath the staircase has been capped off with some less-than-pretty paneling. We’re thinking about removing that framework and making better use of the space.
  7. And… I have an extra roll of insulation, so I’m going to try and repair any area that feels even the littlest bit drafty.

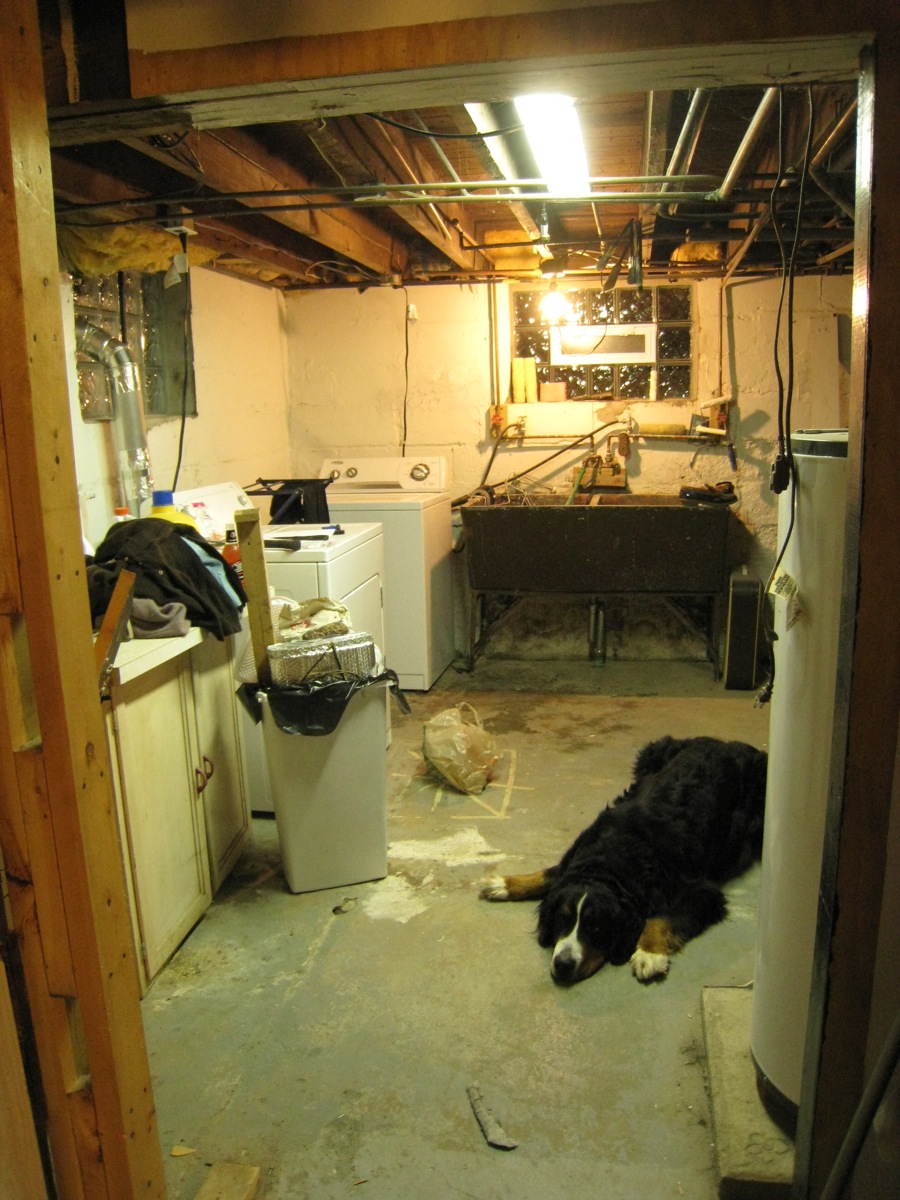
I’ll update you as we make progress, but here are some initial photos from the demo (sorry so dark, I wish there was more natural light down there):

What's going on with this wiring in the outlet? There must have been 20 different wires hacked in there. Bad news, good thing it was coming out.

The framework around the sink has been removed, here. Still lots to go.

And seriously, if it's after 8PM, the dog just sleeps through the sawing and hammering. Puppy exhaustion.

Share

Basement

Emily
I'm a home improvement enthusiast living a very merry, DIY-filled lifestyle. As a freelance writer, you can find my work on many popular home and garden sites, including HGTV.com, HomeLivingHandbook.com, and other outlets. Follow me on social, or drop me a note.

2 Comments


Marty
January 7, 2011 at 2:23 pm
Reply

Let me say great site, and your posts are entertaining and motivating!

I wanted to chime in on your sketch—I noticed “tile?” as a thought for the top your your workbench.

As I currently have 6 workbenches, two at my home shop, and four at my warehouse, I felt compelled to share about one of my favorite things in life.

The workbench.

I’ve built at least 20 in my lifetime (most still in service today), using various construction methods and materials depending on the type of work I would do on the bench.

It seems you want a good, all-around, I’m-going-to-bang-stuff-with-a-hammer-but-also-assemble-a-lighting-fixture-before-I-put-it-up-type of bench.

I’d skip the tile top and go with carpet. Yup. Carpet.

Tucked away in the corner (at the end of aisles 1-3, NE corner of store, here in FL), your big box home center has some bland gray/charcoal closed loop short pile carpet. Yeah, on that big rotating carpet holder thing that I desperately want to know the keycode to operate. It’s like the last type of carpet you would put inside your home, but if you put it on your porch it would be like “damn, this is nice carpet”. And on your bench even nicer.

The carpet isn’t too nice that you’d be afraid to drill into it, or wipe that extra silicone from your finger onto it…because it’s still crappier than your work pants.

But it offers some cushion when you want to assemble that new nickel-plated bathroom light fixture without a scratch. And, it looks nice.

A quick shop vac or stiff bristle bench brush gets it all nice again after your project.

A word of caution. If you are sweating copper pipe or soldering on it, it’ll melt. Which can be fun sometimes, but not recommended.

But that’s why we layer. Read on…

Top the bench with layers. Like girls do with clothes. Or how gossip magazines say celebrities cut their hair (not that I read them, unless left on the workbench). Or something more manly…a mexican dip you eat during halftime while watching the Bills play.

So you’ve built a structure from 2×6 or better lumber, right? I know you’re reclaiming, and besides, I’m only talking toppers here.

Now we layer to build the top.

First layer: 3/4 ply. Good ol’ plywood. Not OSB. Not even CDX. No need for exposure. Just “D” plywood. Or maybe “C”. Or if Pete finds something on the side of the road, then…okay…that.

Second layer: 3/4 MDF. Medium-density Fibreboard. Yes, that’s an “re” in Fibre since I think it came from across the pond prior to having it in the US. MDF is nice and flat and works (finishes) well. Plus it’s dense, so dogs under the bench will experience a -3dB reduction in hammer blow noise.

Third layer: Carpet. As previously mentioned. Use one of those fancy pneumatic ½” crown staplers to “upholster” the bench top. Wrap it around the edges and staple underneath. No glue. One day you might want to replace it (although I have a bench going on 10 years and it’s just fine).

Done? Nope.

Let’s make this like a McD’s Surf and Turf (a big mac with a filet-o-fish instead of the middle bigmac part of the bun). Incidentally, I did pitch this idea to the golden arches. Yes, laugh.

Ummm, okay, so you have carpet, now cut another piece of MDF to overlay the carpet. You keep this piece behind your bench, and when you need to solder, or drill or just need a smooth surface because those #6 lockwashers are way too small to keep track of on carpet, then you pull this out and WHAM!

You got two benches-in-one.

Oh and, bolt it together.

A wussy bench screws make.


    Pete
    January 7, 2011 at 2:53 pm

    Marty, This is all awesome advice. This may have to be recycled as an actual post instead of an extra long comment.

Leave a Reply Cancel reply

Your email address will not be published. Required fields are marked *

This site uses Akismet to reduce spam. Learn how your comment data is processed.

  • HI, I’m Emily

    Emily Fazio

    I'm a home improvement enthusiast, living a very merry DIY lifestyle. Follow me on facebook and instagram, or drop me a note if you'd like. I love notes.

    You can find me writing for Home Living Handbook, HGTV.com, and a handful of other websites.

    Thanks for visiting!

  • Instagram

    merrypad

    I’ll always say yes to a maker space experience, I’ll always say yes to a maker space experience, and The Shed at @timberland’s HQ did not disappoint ✌️🥾 @homelivinghandbook 

Final footwear design not shown 🙂

PS tagging some cute shoes they gifted from the Fall 2024 collection!
    I made the call and snapped off the elephant garli I made the call and snapped off the elephant garlic scapes yesterday evening. Who’s going to help us harvest and eat the next 1,000? 🧄🧄🧄🧄
    Hi! Boy, do I have things to share. 🎉 🫶 Fr Hi! Boy, do I have things to share. 🎉 

🫶 Friendly reminder to focus on balance and wellness: Pete and I lived abroad with our family for the entire month of August 2023. If you ever have the opportunity to work remotely, I promise it to be a worthwhile adventure that’ll change your POV in so many ways. And, If you need an in with an incredible AirBnB in Denmark, DM me. From new playgrounds and museums to the culture and design, making this trip a reality continues to be something we celebrate every day, and I wish everyone can experience it on some level.

💻 Friendly reminder to say yes to new (overwhelming) opportunities: The professional celebration happened upon our return. Last fall, I was approached to launch @homelivinghandbook, a new Pursuit channel for @mensjournal that highlights home improvement and DIY! It has been really fun to see it come to light, and truly one of the most exciting partnerships I’ve ever had. Timing couldn’t have been better, and I’m really happy to see how it grows over time. Please follow along — the team published 150 articles in two months, covering all kinds topics for home enthusiasts! So much more to come. #linkinbio #homelivinghandbook

✌️ the end, many thanks for your support!
    How much garlic is too much garlic? Maybe we’ll How much garlic is too much garlic? Maybe we’ll find out in 2024. Finished planting 1,005 cloves (and 19 shallots) in three new beds at the farm, and crossed one huge chore off my list 📝 #gardennotes #garden2024
    Instagram post 18003690670970980 Instagram post 18003690670970980
    We grew these fools. We grew these fools.
    pumpkin patch is doing great✌️#year1 #squashbl pumpkin patch is doing great✌️#year1 #squashblossoms #pumpkinpatch
    follow emily: @merrypad


  • Like Us On Facebook

    Facebook Pagelike Widget


  • Popular Posts

    • How to Dye Pasta Different Colors (Halloween Recipe) 63 views
    • Honestly, This Is the West Elm Tillary Sectional Sofa 27 views
    • The Easy Way to Hang Art on Brick or Stone 22 views
    • Designing a Durable Wooden Fence For Our Beautiful Backyard Garden 18 views
    • Check Out Our DIY Basement Shelving System 17 views
    • How to Build New Front Stairs and Railings 16 views
    • Less Is More: How to Remove a Fireplace Surround 14 views
    • Create a Unique Spider Web Pumpkin 14 views
    • I Learned To Frame A Window 13 views
    • Reasons We Recessed Our Induction Cooktop 11 views


  • BROWSE POSTS BY CATEGORY:

    • Art Attack (7)
    • Backyard (92)
    • Barn (8)
    • Basement (27)
    • Bathroom (43)
    • Beach (13)
    • Bedrooms (73)
    • Being Thrifty (53)
    • Business-y (12)
    • Buying and Renting and Selling (23)
    • Casual Celebrations (36)
    • Closets (17)
    • Curb Appeal (44)
    • Dainty Details (8)
    • Deck (23)
    • Decor (286)
    • Dining Room (37)
    • DIY (578)
    • Dog-Related (24)
    • Entryway (59)
    • Flooring (58)
    • For the Kids (32)
    • Garage (17)
    • Gardening (70)
    • Helping The Economy (30)
    • HGTV + DIY Network Projects (283)
    • Holiday-Related Projects (80)
    • Home Safety (12)
    • Kitchen (87)
    • Lighting (31)
    • Living Room (77)
    • Merry Travels (21)
    • Office Space (21)
    • Organized (41)
    • Other Pads (14)
    • Outdoor Living (12)
    • Scooter Fun (8)
    • Stairwell (20)
    • Sunroom (22)
    • Supporting Sponsors (43)
    • The Art Room (3)
    • Tools (43)
    • Uncategorizable (1)
    • Wedding (28)
    • Windows (14)
    • Work-pads (10)


  • a little bit of everything, friends, DIY, and inspiration

    • Dadand.com < My husband and his BFF
    • HGTV
    • Home Living Handbook, a Pursuit Channel for Men's Journal
  • Some Legal

    Merrypad incorporates the occasional affiliate link to Amazon.com and Minted; we link to many other websites and products, but if it is in context of a paid sponsorship, it is always noted as such. Please review the privacy policy and contact me if you have any additional questions.

    Theme customized by Pete Fazio Creative, the guy from dadand.com.


© Copyright Merrypad